

Paul Stoffregen
-
Posts
74 -
Joined
-
Last visited
Posts posted by Paul Stoffregen
-
-
but they never actually recognize or mount an sd card within that drive. Any idea why?
This is very likely a missing or incorrect connection betweeen the SD card adaptor and the Teensy. There are 10 pins, and only 6 actually are needed.
I really need to publish a diagnostic program and procedure. The very first step is to use a multimeter to measure the voltage on the MISO pin (the B3 on Teensy, or the lower right corner of the SD adaptor when held with the SD card opening on the left). Connect the negative probe to ground and the positive to MISO. Remove any card, so the slow it empty. Load the LED blink program onto your Teensy, so that nothing is attempting to communicate with the card. Under these conditions, you should measure 3.3 volts on MISO.
If you do see 3.3 volts, that verifies the SD adaptor is getting power and correctly converting it to 3.3 volts, and the pullup resistor on the board is connecting 3.3 volts to the MISO pin. These circuits are tested on every board at PJRC using a bed-of-nails test fixture, so if something is wrong, most likely the board isn't getting power.
Next make sure you can see 3.3 volts actually on the B3 pin on the Teensy. That verifies the connection is good all the way from the SD adaptor down to the Teensy.
There's only 3 more signals to check. I should really write a tiny program than drives them with different duty cycle waveforms, so you'll see something like 1 volt, 1.5 volt and 2 volts on each. Its pretty simple to do this, if anyone wants to take a shot at the coding. Obviously, such code should be run only when a SD card is not inserted. The test with a multimeter involves checking the voltage on the Teensy side, and then checking for the same voltage on the SD adaptor side. If there's a bad connection, you'll discover it by seeing different voltage when they should be identical.
The final diagnostic would just probe the SD card and print lots of verbose info about it to the serial monitor window. This won't probably help you much, since by the time this works, everything else will too. Then again, perhaps there's a slim chance you have some very strange card? If you did, I'd offer to swap it for a normal one of equal or greater capacity. But I already have a pretty good collection of cards covering version 1 and version 2 of the spec, and both standard and high capacity on v2 (but i don't have any SDXC cards......)
As for actually using the card, well, via USB you should be able to read and write the card using Windows, Mac or Linux.
The tricky part is access to the card for code running on the Teensy. The SdFat library is the best option today. Unfortunately, it knows nothing about the USB, so using it while the USB is connected is very risky.
Eventually, I'm going to implement either a full replacement for SdFat, or a partial one that replaces the low-level drivers for ones that integrate with a locking mechanism together with the USB. That will at least prevent horrible collisions at the SD card protocol level. Additional management will be needed at the filesystem level, and the bad news is there's really no way to inform Windows, Mac or Linux about filesystem operations on the device. So it will be limited to simulating a card removal (giving you completely exclusive access), and controlling if the operating system sees the media as writable. None of those media sharing and management functions exist yet. (it's called "experimental" afterall.... the other known problem is the USB disk activity hogs the Teensy CPU time very badly.... I have a plan there too, but it will take a lot of work too).
Anyway, the diagnostic programs should be quite a bit easier to write, so please do remind me if you're still struggling to get it to work. Those and some step-by-step instructions should provide some relief (if this message didn't do the trick).
-
for /F %a in ('WMIC logicaldisk list brief ^| find "VOLLABEL"') do %a\mytest.exeReplace VOLLABEL with the flash drive's volume label
Awesome, thanks! Works great. :)
I had to add the ability to assign a volume label when using the internal memory for USB disk. I guess now I should probably add info about that to the auto-generated readme file and upload a new Teensyduino....
-
This is probably a silly question, but honestly I almost never use Windows, soooo...
I'm working on a new example application that will make use of the USB disk feature in 0.9, and demonstrate a number of more advanced I/O concepts. I wrote a little application and compiled it to a .EXE, which will be stored on the USB disk. The EXE works. That was the easy part (actually, I wrote and tested it in Linux, then ported to Windows)
So, the main question is how do I figure out the drive letter that Windows assigns, so I can run it at the command prompt? Or is the some way to run it without knowing the drive letter?
Specifically, the device is plugged in. The HID keyboard types Win-R, then "CMD". Then I wait a bit for Windows to detect the disk. If I knew the drive letter in advance, I could just have the keyboard type something like "E:\MYTEST.EXE" to run it. But I don't know if the drive letter will be E:, F:, G: or whatever.
Any ideas? I'm sure this is probably very obvious to you folks who know Windows so well.
-
Is this process the same with Mac and Linux?
Each has its own API. My examples are coded for all 3. The best way to answer your questions would be the review the actual code.
Also, I saw some posts about changing Vendor ID and Product ID and the comments states go to arduino-xxx/hardware..../usb_private.h ...where exactly do I find this file?It's inside Arduino.app, which MacOS presents as a single file. If you right click (or option click), there's an option to show bundle contents. Then you can find the file inside. Or if you use the Mac Terminal program and navigate the traditional unix command-line way, all files are easily viewable.
I have looked all over my mac and tried to find it on www.pjrc.org and I have no idea where...It's embedded within the Teensyduino installer. Those files aren't provided separately, because it's a real pain to manually install them all in the right places, especially the java bytecodes. The exact procedure changes with each new version of Arduino, so an automated installer is really for the best. In fact, before version 0.9, I wrote separate installers for each Arduino version. Version 0.9 unifies them into a single installer than can install into multiple versions of Arduino.
The goal is to make everything as easy as possible. Apple goes one step farther by making the Finder and default file/dir dialogs present a simplified view of the filesystem. That's nice, until you want to actually look at files within application bundles. You can access that stuff, but you have to do something special to get inside the bundle contents if you're using the Finder.
-
I was hoping that Serial.read() could some how read characters on the Terminal or communicate with it.
Yes, you can.
If you're using HID keyboard, then Serial is mapped to a custom HID interface. To send data to it, you'll need to write code. On Windows, you would send using WriteFile()... but opening the handle to the device involves jumping through a bunch of WIN32 hoops. You use HidD_GetHidGuid and SetupDiGetClassDevs to get a list of all HID devices, and SetupDiEnumDeviceInterfaces and SetupDiGetInterfaceDeviceDetail to inspect each one. You can look at the vendor and product ID, or you can just open the device with CreateFile, and then use HidD_GetAttributes, HidD_GetPreparsedData and HidP_GetCaps to inspect the usage page and usage numbers. Since Windows will generally let you play havoc with all non-keyboard HID devices, it's a good idea to check all 4 numbers before you go blasting out packets with WriteFile (which will give you an error if your write isn't exactly the correct packet size). Then again, if the vid & pic check out, maybe that's good enough... but you still have to use those ugly setupapi functions to get the device path name which CreateFile needs to open a handle to the device.
You can look at the Raw HID and Hid Listen programs for some example code. It's ugly WIN32 programming, but only several dozen lines which isn't too bad as WIN32 goes!
Also, if you write code with the setupapi using Microsoft's tools, you might need to get their DDK for the missing headers and stuff. I personally do all my Windows programming using MinGW as a cross compiler running on Linux. All my examples will compile "out of the box" on Ubuntu with the mingw packages installed. How to build Windows executables actually in Windows is something I can't help you with!
The other very easy, but very limited path, is you can control the 3 keyboard LEDs. Irongeek posted an example of how to read them from your program. Maybe you could use Morse code?
Of course, if you're using the SD card, you could write to it. But reading it from the Teensy involves using a library like SDfat... and if you try accessing the card while the USB is active and the operating system believes it has exclusive access, well, it's possible to get thing horribly confused.
-
Can you explain to me what is Serial.print()? What is it used for? Thank you!
Usually Serial.print() is used to print info about what your program is doing, much like you might put a bunch of printf() lines inside a C or C++ command-line program. Usually you'd use the Arduino Serial Monitor, which is the right-most button on the toolbar inside the Arduino IDE, to view whatever is sent by Serial.print().
On a real Arduino board, Serial.print() sends bytes via the UART, which go to a USB-Serial converter chip. On Teensy, when you select USB Serial (with Teensyduino version 0.8 from one of the entries in the Tools->Boards menu, with version 0.9 from the Tools->USB Type menu), Teensy then implements a USB Serial device type and Serial.print() works pretty much the same as on Arduino, except at native USB speed.
Of course, unlike Arduino boards, Teensy can implement non-serial device types, and in particular HID keyboard is what pretty much everyone here is interested in. When you select any of those non-serial types, there is actually an additional "vendor specific" HID interface implemented in parallel with the HID keyboard, and Serial.print() sends data to that interface. On the PC, Teensyduino runs a special "teensy_gateway" process which listens for that custom interface and provides the data to the Arduino Serial Monitor.
So even when Teensy isn't implementing a serial device, you can still put Serial.print() into your code and a separate communication channel is emulated so it still "just works" with the Arduino Serial Monitor pretty much exactly you'd expect.
-
Yup, just install the experimental 0.9 version. You'll notice there's a new "USB Type" sub-menu within the Tools menu. Use it to select "Disk(SD card) + Keyboard". Then just upload like normal, and if the SD card is connected properly to the 4 pins plus power, it'll show up as a USB disk. There's also a "Disk(Internal) + Keyboard", which uses the remaining memory in the Teensy as a disk. On Teensy it's read-only, but you can pre-populate it with files by putting them into a certain directory. On Teensy++ the internal disk is read-write. SD cards should always be read-write, unless they've been specially write protected, which is very rare.
Not many people try 0.9, maybe because "experimental" sounds pretty scary? About the worst case is you'd have to reboot, delete everything, and just unzip a fresh copy of Arduino and install 0.8 again. But I believe you'll have a much better experience than that. Please do give me some feedback either way.
Eventually I'm going to add a filesystem layer, so you can access the disk from your Teensy-based programs. That will probably need a lot of testing! You can also see my to-do list on that page. If there's anything I missed, now's the time to speak up. When 0.9 become "official", it'll probably be a 3 to 6 month period until 1.0 is made.
-
First, try compiling and using the command line version.
-
but then you would need a teensy loader app for your android, and that doesn't exist...
Does the open source command line version compile and work on Android?
Is there a widely available netbook or laptop, or really ANY android hardware that would be a compelling platform? (eg, something with a viable keyboard)
The GUI-based Teensy Loader is built using wxWidgets. I'm certainly willing to give it a try on other platforms, if wxWidgets supports them.
Some time ago, as an experiment, it was compiled on Maemo Linux and ran on a Nokia smartphone, so it certainly is possible to build it on small-ish devices, if wxWidgets can support them. However, on the Nokia smartphone, it had some issues where it unnecessarily took the whole screen, which apparently is the default behavior unless the app is coded to use some other API. No further work was done beyond "yup, it works, but it's not particularly useful".
For a public release, it has to meet at least a liberal definition of "actually useful".
-
Looks like I didn't make any way to do this. Those numbers are part of an array in program memory, so it only matters what their values are when that array is compiled.
You could try editing usb.c, and remove "static" from the device descriptor array. Change it from this:
static uint8_t PROGMEM device_descriptor[] = {
to this:
uint8_t PROGMEM device_descriptor[] = {
Then, in your program, copy that entire array, and change the VID & PID to whatever you like. It's critically important that you do NOT change the name of the array. It's also pretty important you specify endpoint zero's size correctly, but if you include usb_private.h, you'll have the same definition used within usb.c.
The array inside usb.c will still get compiled, and put into a ".a" library, which is then linked with everything you've writtten. The default behavior is supposed to be that any global symbols you've defined will override anything the linker gets from libraries. I know this works for functions. Maybe it'll work for that array? Of course, it's not a global symbol until you remove the "static" from the definition.
If this works, I'll remove "static" in a future version, like 0.9-alpha5. I might change the name from "device_descriptor" to "usb_device_descriptor", since it'll become a global symbol. I might also make a couple more of those numbers into proprocessor symbols, so if you re-copy it with those symbols, it'll automatically change correctly when/if you switch between the USB types.
I just made this all up and haven't tried it, so please let me know if it works?
-
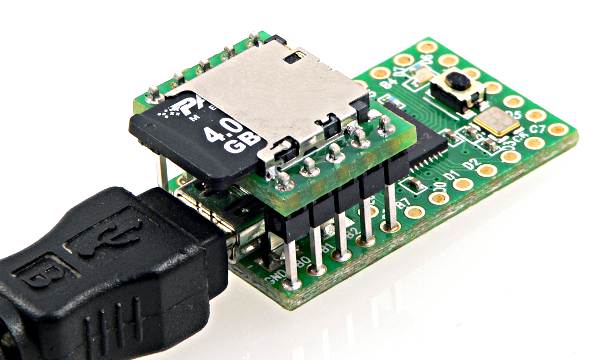
Very soon there will be pins available separately, but they're the 12 pins meant for Teensy to plug into a breadboard. You can just cut off two chunks of 5 and throw the other 2 away, and use those 5s to attach the flash card. In fact, that's what I did for the one in the photo. If you place an order for the SD adaptor before this appears on the website, just mention this message in the comment box on step #3, and I'll put one in your order.
Later, like July, maybe even August timeframe, there will be pins that are perfect for the SD adaptor. They have two black plastic parts instead of just 1, so they hold the boards apart perfectly. Unfortunately, they're a custom order part, and even though I ordered them over a month ago, it's looking like they won't be here until at least July :(
Of course, the electrons don't care which type of pins you use, though it can be a bit fiddly to get the boards lined up perfectly level to each other as you solder that first pin (notice I took the photo looking down at it, instead of a pure side view.......)
-
32 gigs is the max according the SD 2.0 spec... but largest available on the market today seems to be 16 gig.
-
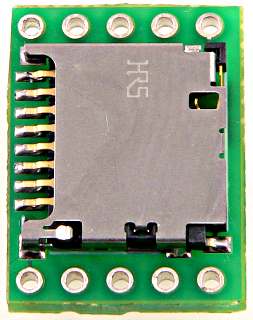
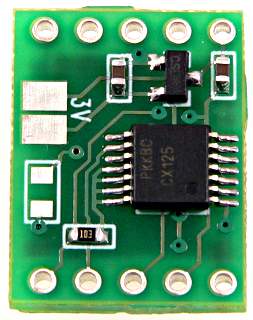
The SD card adaptor is now available.
http://www.pjrc.com/store/sd_adaptor.html
Right now, there are only 15 pre-production boards available (yes, these were all hand soldered, but they've all been fully tested with a Micro SD card). Within a couple weeks there should be plenty of the full production boards. To use these, you'll need the latest Teensyduino 0.9-alpha4 installed.
Top Side:
Bottom Side:
-
You need the set the clock prescaler at the beginning of your program, if you want anything other than the default of 2 MHz. All of the C examples I've published do this. Here's the safest code:
int main(void)
{
        CPU_PRESCALE(CPU_125kHz);
        _delay_ms(1);           // allow slow power supply startup
        CPU_PRESCALE(CPU_16MHz); // set for 16 MHz clock
        //rest of your program
You can also just immediately set it to 16 MHz if you're sure the power supply comes up quickly, but this tiny delay is much safer in the most extreme case where the CPU begins running before the power is all the way up to 5 volts.
Here's some #defines you probably want to put in a header or someplace...
#define CPU_PRESCALE(n) (CLKPR = 0x80, CLKPR = (n))
#define CPU_16MHz       0x00
#define CPU_8MHz        0x01
#define CPU_4MHz        0x02
#define CPU_2MHz        0x03
#define CPU_1MHz        0x04
#define CPU_500kHz      0x05
#define CPU_250kHz      0x06
#define CPU_125kHz      0x07
#define CPU_62kHz       0x08
-
Teensyduino 0.9-alpha4 uploaded, for Linux, Mac and Windows. Now "Disk(SD Card) + Keyboard" appears in the Tools->USB Type menu, and if you build with it, your Teensy will look for the SD card attached to the 4 SPI pins.
Here's that page where you can download it:
http://www.pjrc.com/teensy/experimental.html
Those first 15 pre-production boards should be available to order sometime this weekend. You could also wire up a SD card, just make sure to convert the power and signals to 3 volts because 5 volts will blow a SD card.
I'm sorry this is all delayed a bit... I've been testing and debugging all week. Although it was working pretty well on Linux and Mac, until yesterday there were several minor bugs with handling the SD card and reporting media status which messed things up on Windows (and makes me wonder how it ever seemed to work so well on Mac and Linux). It's looking pretty good now!
-
I'm going to add this to the Teensyduino 0.9 alpha, so it will just work automatically if you select it from the Tools->USB Type menu.
There are also a few different Arduino libraries (of varying capability and quality) for accessing the SD card. For now, if you want your code to actually access the card, you'll need to use one of those. In time, I'm going to build similar code into Teensyduino (with features to manage if the USB or your code has access to the card), so a separate library won't be needed. That's going to take time to write and test, but it is coming.
-
Quick update... I've got the SD/SDHC card stuff working, except media removal and insertion isn't being properly reported to windows. Mac and linux are perfectly happy with my scsi sense keys, but not windows. I'll get it figured out soon. Tonight I hooked up a regular card reader to my protocol analyzer... but it's one of those many-in-one types that windows detects as 3 drive letters, so there's a lot of extra traffic that's confusing to sift through. Tomorrow I'm going to go buy a SD-only card reader and watch how it reports this stuff. There's gotta be some tiny detail that matters for windows, but linux and mac manage just fine.
Reading and writing the card does work fine in windows, and mac and linux with the code as it is. If I don't get this last bug fixed soon, I'll probably make a release with it and if you pull the card, well, just unplug the whole cable to let windows know it's not there. Hopefully I'll figure this out so nobody will have to do that.
Here's a picture of the adaptor soldered onto a Teensy.
Maybe you're wondering when you can actually get one of these? There will be 15 pre-production boards built later this week, and another 15 next week. I'll post a link in the next few days when these can actually be ordered. Just subscribe to this thread if you want to be notified. These pre-production boards will be available on a first come, first serve basis at $10 each. Please, if you're not planning to actually use it right away, please wait for the production boards (and save yourself a few dollars). The hardware is simple, but the supporting code is quite complex, so everybody will benefit if the people who get these first pre-production boards can use them and report any bugs. Sometime between the middle to end of June the production boards will be ready. Those will likely sell at $7, maybe even $6 each. There will be plenty to go around!
-
You could try looking at the code!
It's only 219 lines (plus a 7 line PHP script). Much of it is just strings which encode the "payload", which is only 41 lines (about 1400 bytes), mostly a tiny javascript fragment and some XML. He put the plugin files in a subdirectory, so you can look at them naturally instead of inside strings. The plugin is only 3 tiny files totaling 41 lines. The actual javascript code is only 11 lines! There's no large, complex binary. It's all just simple, tiny text files you can look at using any lame program, even Notepad.
Can you go into a little more detail on how exactly this works?If you'd read the code, it's pretty easy to see those 11 javascript lines just add an "onkey" event listener, which packs every 20 keystrokes into the query string on a HTTP get request to a particular URL. The 7 lines of PHP receives it and puts it into a file. There's some XML which presumably the browser's plugin install process wants. The actual code basically just types these tiny files in, then adds a registry key. Maybe I missed a detail or two, but that's the jist of it.
If there were ever a scary example of why modern operating systems are going to have to rethink their trust model for HID, this is certainly it. Scary, but pretty amazing, in a creepy kinda of way. If anyone at Microsoft, Apple or any Linux kernel developer doesn't believe blindly trusting all HID devices is a real issue, all they need to do is take one look at this!
To be honest, I had absolutely no idea a keystroke logging plugin would be so tiny and so simple.
I also never imagined people would make these kinds of things when I created Teensy. Please please please be responsible with this stuff.
-
I've got it working now in read-only mode, working on being able to write to the card.
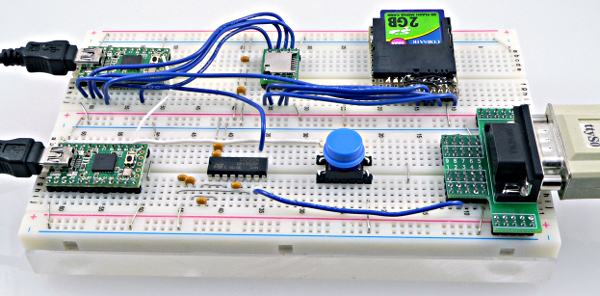
That tiny board in the center of the top breadboard is the Micro SD adaptor, which includes a 3 volt power supply and 5 to 3 volt buffers, so the Teensy can run at full speed. Those boards will probably sell for about $7. It's meant to solder to the first pads on the Teensy, just over the top of the USB connector. At first there will be a very limited production of these boards, probably about 20 pieces, likely within the next week or two. They'll be manufactured in quantity by the end of June.
I still have a lot of work to do on the software side, at least for people wanting to use this for projects where their own code does something more than sending HID keyboard data. Heavy access from the PC hogs the Teensy CPU time, sometimes starving other interrupts, but i have a plan for that. I'm also planning a locking layer for sharing the hardware, and of course filesystem drivers.... so much coding to do!
But soon a new alpha version will be out, which at least makes the card available to the PC.
-
would it be possible to add a USB-CDROM feature for the teensy to mount iso files?
Possible, yes.
Easy, no.
Likely, not very ... at least as part of Teensyduino, where you can just click it in a menu and everything is done for you very automatically.
so you can boot from the teensy?Until SD card support exists and is stable, I wouldn't even consider this. The internal memory just isn't large enough to hold any meaningful PC or Mac boot code. With 12 Mbit/sec USB, you're never going to see over about 1 Mbyte/sec. Maybe speed equivalent of 6X cdrom drive might be useful for some applications?
There is a guy who made a CDROM emulating device using Dean Camera's LUFA library. He has since moved to the more powerful (and complex) AVR32 chip which has 480 Mbit/sec USB. But here's his website.
http://renosite.com/cdemudetails.html
I do not believe he's published any code, but you could probably ask a question or two.
If your goal is simply to boot, is a full CDROM (scsi type 5) emulation with ISO9660 filesystem really necessary? There is a USB mass storage bootability spec, which honestly I haven't looked into much (yet). Would booting be possible as a scsi block device with those features implemented? (hint, the answer involves going to usb.org and carefully reading the mass storage class specs....)
-
There are ways to capture a log of all USB communication. The best (but expensive) is using a protocol analyzer like the Beagle 12 from Total Phase. I have one right here, and if that keyboard were here I could just plug it in, start a capture, and press the key.
I have not personally used any of the software approaches that claim to capture USB packet logs. But they are out there. Maybe you could try using one of those?
-
USB Disk: using internal flash memory (Teensy = read-only, Teensy++ = read/write)
sounds awesome, any furthur details, hwo to enable / use etc.?
Just choose it from the menu and click the upload button.
I added a new "USB Type" sub-menu inside the Tools menu, because putting both the board and usb type inside Tools->Boards was getting to be a long list. Also, many people (probably those with a lot of experience with normal Arduino boards) don't ever notice there's more than 1 choice for their board. Hopefully having the usb type in its own menu will improve usability.
My goal is to make it very easy to use. The build process copies files from a specific directory to populate the filesystem on your freshly uploaded USB disk. If that directory doesn't exist, I coded it to give you readme file that tells you where that directory needs to be. At least it's supposed to be easy. If something's not obvious, please tell me. It's hard to anticipate how people will experience this stuff for the first time while being so deeply buried in the fine details.
might want to test to see if it actually does need rebooting tho... not all regedits doI'll give that a try, though I might not do much more on this windows-wise for a couple weeks. I'm probably going to focus on the SD card support and the filesystem layer, so people can build more interesting apps like data logging. I always develop on Linux and then port to Mac and Windows. I even compile the .exe files on linux using mingw in cross compiler mode. My windows test system got all messed up, yet again, and needs another reinstall... buy probably not for a couple weeks.
-
There are 4 tutorials about Teensyduino. The first one just walks you though installing the software.
http://www.pjrc.com/teensy/tutorial.html
The other 3 involve hooking up electronics on a breadboard, which may or may not interest you so much. To do those, you really need a Teensy with pins (or solder header pins onto your Teensy), and also the breadboard, parts and wire. All that stuff is pretty cheap, but then if you're starting from nothing it does add up.
But if you just want to control a PC, just look at the examples of using Keyboard.print(), Mouse.move(), etc. There's documentation and examples on these pages:
http://www.pjrc.com/teensy/td_keyboard.html
http://www.pjrc.com/teensy/td_mouse.html
There's also an experimental alpha release of 0.9 which gives you the option of making Teensy be a disk and keyboard. The first time you run it, the disk gets populated with a readme file that give you instructions about how to seed it with your own files (eg, just make a directory in a certain place and put the files there).
-
Also, beware avr-gcc 4.3.0. It has horrible bugs. 4.3.2 works great.
[Version 1] Brute Forcing With The Ducky.
in Classic USB Rubber Ducky
Posted
Even if the operating system does nothing to limit the speed of your guessing (which it easily can and certainly should), USB keyboards at 12 Mbit/sec are limited to 1000 state changes per second, due to the design of the HID protocol. Each keystroke is usually implemented as 2 events, a key down and key up.